Quantcast
Channel: Code rant
Viewing all 112 articles
Browse latest View live

In Praise of TestDriven.NET

$
0
0

I’ve been using TestDriven.NET by Jamie Cansdale for quite a few years now. Ostensibly it’s a unit test runner, but that is not the real reason why you should use it. The killer feature, the one that will give you developer super powers, is the ability to run any arbitrary code under the cursor.

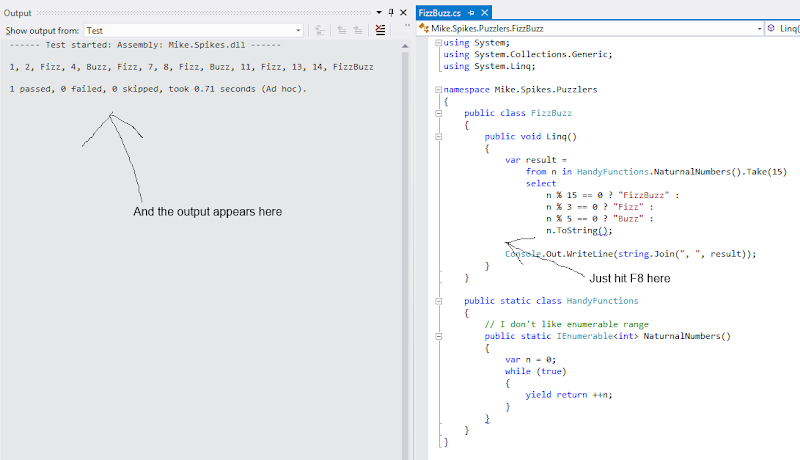
TestDriven allows you to run individual unit tests simply by placing the cursor within the test method and running the command ‘RunTests’ (I have this mapped to the F8 key - who uses bookmarks anyway?) The really cool thing is that the method doesn’t need to be attributed as a unit test, it can be any arbitrary method. Any return value from the method is written to the Visual Studio output console, as are any Console.WriteLine() or Console.Write() statements. This gives you immediate feedback on any code with a single keystroke.

 TestDriven

Why is this awesome? The key to productive software development is reducing latency; the cycle time between an action and its results. That’s why continuous integration and continuous delivery are such huge wins. When you’re coding, the quicker you can try a quick experiment and see the results, the more productive you will be. The big problem with compiled languages like C, C++, Java, and C# is that the compilation cycle acts as huge barrier to iteration. I still remember with horror how I used to write some code, launch my application, navigate to where the feature would be exercised (taking care to enter the correct parameters of course) and then watch it fail. And then I’d repeat the same tedious cycle over and over again. That’s one of the main reasons why .NET developers spend so much time stepping through code in the (admittedly excellent) debugger, because it’s hard otherwise to know how the last few lines of code you wrote are executing. Now I run code continuously without launching anything. Simply write a function, F8, iterate. It’s so much more productive.

I know fellow developers who use other tools as a scratchpad for iterative experiments. LinqPad is very popular and ScriptCS is deservedly getting a lot of attention. But TestDriven has a huge advantage over these because it works inside your Visual Studio environment. There’s no need to copy and paste your experiment into your application, you iterate in place and in the context of your existing code.

Give it a try. I’ve found it a game  changer for C# development. It’s a pretty good test runner too.


EasyNetQ: Publishing Non-Persistent Messages

$
0
0

logo_design_150

In AMQP, buried in the basic.properties object that gets sent along with each published message, there is a delivery_mode setting. You can set it to either ‘persistent’ (1), or ‘non-persistent’ (2). It controls whether a message is persisted to disk or not. In the AMQP spec:

“The server SHOULD respect the persistent property of basic messages and SHOULD make a best-effort to hold persistent basic messages on a reliable storage mechanism.”

Of course it’s pointless setting delivery_mode to ‘persistent’ if you’re not publishing to a durable queue.

By default EasyNetQ sets delivery_mode to persistent (1) when calling IBus.Publish. We make the assumption that people would want this safe behaviour out-of-the-box. However, it does introduce a performance hit, so if you don’t care about losing messages in the case of a server restart you should be able to change this behaviour.

From version 0.26.3, EasyNetQ has a new boolean connection string parameter ‘persistentMessages’. By default it is set to true, but if you don’t need persistent messages, but do need high performance, set it to false:

vas bus = RabbitHutch.CreateBus("host=localhost;persistentMessages=false");

This setting has no effect on the advanced API (IAdvancedBus) where you have access to basic.properties and are free to set delivery_mode on a message by message basis.

EasyNetQ: A Layered API

$
0
0

I had a great discussion today on the EasyNetQ mailing list about a pull request. It forced me to articulate how I view the EasyNetQ API as being made up of distinct layers, each with a different purpose.

EasyNetQ_API

EasyNetQ is a collection of components that provide services on top of the RabbitMQ.Client library. These do things like serialization, error handling, thread marshalling, connection management, etc. They are composed by a mini-IoC container. You can replace any component with your own implementation quite easily. So if you’d like XML serialization instead of the built in JSON, just write an implementation of ISerializer and register it with the container.

These components are fronted by the IAdvancedBus API. This looks a lot like the AMQP specification, and indeed you can run most AMQP methods from this API. The only AMQP concept that this API hides from you is channels. This is because channels are a confusing low-level concept that should never have been part of the AMQP specification in the first place. ‘Advanced’ is not a very good name for this API to be honest, ‘Iamqp’ would be much better.

Layered on top of the advanced API are a set of messaging patterns: Publish/Subscribe, Request/Response, and Send/Receive. This is the ‘opinionated’ part of EasyNetQ. It is our take on how such patterns should be implemented. There is very little flexibility; either you accept our way of doing things, or you don’t use it. The intention is that you, the user, don’t have to expend mental bandwidth re-inventing the same patterns; you don’t have to make choices every time you simply want to publish a message and subscribe to it. It’s designed to achieve EasyNetQ’s core goal of making working with RabbitMQ as easy as possible.

The patterns sit behind the IBus API. Once again, this is a poor name, it’s got very little to do with the concept of a message bus. A better name would be IPackagedMessagePatterns.

IBus is intended to work for 80% of users, 80% of the time. It’s not exhaustive. If the pattern you want to implement is not provided by IBus, then you should use IAdvancedBus. There’s no problem with doing this, and it’s how EasyNetQ is designed to be used.

I hope this explains the design philosophy behind EasyNetQ and why I push back against pull requests that add complexity to the IBus API. I see the ease-of-use aspect of EasyNetQ as its most important attribute. RabbitMQ is a superb piece of infrastructure and I want as many people in the .NET community to use it as possible.

EasyNetQ: Client Details in Connection String

$
0
0

From version 0.27.3 of EasyNetQ, you can set your client product name and platform in the connection string:

var bus = RabbitHutch.CreateBus("host=localhost;product=pdf.render;platform=snowball");

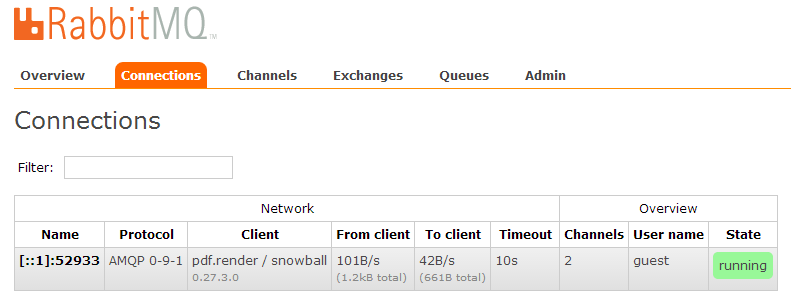
These will then appear in the RabbitMQ Management UI connection list under the Client column:

ManagementUI_Client_Column

Underneath is the EasyNetQ version number.

If you don’t specify product or platform, the product is shown as the name of your executable, and the platform is the host name.

Git Tips: Revert with a new commit

$
0
0

Sometimes you want to set the state of your project back to a previous commit, but keep the history of all the preceding changes. You want to make a commit that reverses all the changes between your previous commit and the current HEAD.

First let’s create a new branch, ‘revert-branch’, from the commit we want to revert to. In this example we’re just reverting to the previous commit (I’m assuming that we’re currently in branch ‘master’), but this can be any commit:

git branch revert-branch HEAD^

Next checkout your new branch:

git checkout revert-branch

Now the neat trick: soft reset the HEAD of the new branch to master. A soft reset changes the state of HEAD, but doesn’t affect the working tree or index:

git reset --soft master

Now if we do a git status, we’ll see that the index reports the reverse of the commit(s) that we want to revert. In this case I want to back out of the addition of ‘second.txt’, but this could be a far more complex set of changes:

$ git status
# On branch revert-branch
# Changes to be committed:
# (use "git reset HEAD <file>..." to unstage)
#
# deleted: second.txt
#

Now I can commit this ‘reversal’:

git commit -m "reverted to initial state."

Test and merge revert-branch into master. Nice.

Coconut Headphones: Why Agile Has Failed

$
0
0

The 2001 agile manifesto was an attempt to replace rigid, process and management heavy, development methodologies with a more human and software-centric approach. They identified that the programmer is the central actor in the creation of software, and that the best software grows and evolves organically in contact with its users.

My first real contact with the ideas of agile software development came from reading Bob Martin’s book ‘Agile Software Development’. I still think it’s one of the best books about software I’ve read. It’s a tour-de-force survey of modern (at the time) techniques; a recipe book of how to create flexible but robust systems. What might surprise people familiar with how agile is currently understood, is that the majority of the book is about software engineering, not management practices.

So what happened? Why is agile now about stand-ups, retrospectives, two-week iterations and planning poker?

Somehow, over the decade or so since the original agile manifesto, agile has come to mean ‘management agile’. It’s been captured by management consultants and distilled as a small set of non-technical rituals that emerged from the much larger, richer, but often deeply technical set of agile practices.

It’s often said that ‘bad agile’ resembles a cargo cult. James Shore has an excellent post, Cargo Cult Agile, that describes how rigid adherence to the ritualistic forms of agile methodologies closely resemble South Pacific cargo cults:

“The tragedy of the cargo cult is its adherence to the superficial, outward signs of some idea combined with ignorance of how that idea actually works. In the story, the islanders replicated all the elements of cargo drops--the airstrip, the controller, the headphones--but didn't understand where the airplanes actually came from.

I see the same tragedy occurring with Agile.”

Current non-technical agile practitioners still don’t understand where the airplanes come from. They stand in their bamboo control towers with their coconut headphones on and wonder why their software projects still fail.

Agile has indeed become a cargo cult. Stripped of actual software engineering practices and conducted by ‘agile practitioners’ with no understanding of software engineering, it merely becomes a set of meaningless rituals that are mostly impediments and distractions to creating successful software.

well-ask-them-for-estimates

The core problem is that non-technical managers of software projects will always fail, or at best be counter productive, whatever the methodology. Developing software is a deeply technical endeavour. Sending your managers on an agile course to learn how to beat developers over the head with planning poker, two week iterations and stand-ups will do nothing to save spaghetti code and incompetent teams. You might have software projects that succeed despite the agile nonsense, but that would be coincidence, not causation.

Because creating good software is so much about technical decisions and so little about management process, I believe that there is very little place for non-technical managers in any software development organisation. If your role is simply asking for estimates and enforcing the agile rituals: stand-ups, fortnightly sprints, retrospectives; then you are an impediment rather than an asset to delivery.

Please don’t put non-technical managers in charge of software developers.

I don’t have an answer, or an alternative methodology to offer you, but here are some things that any software development organisation must address:

  • The skills and talents of individual programmers are the main determinant of software quality. No amount of management, methodology, or high-level architecture astronautism can compensate for a poor quality team.
  • The motivation and empowerment of programmers has a direct and strong relationship to the quality of  the software.
  • Hard deadlines, especially micro-deadlines will result in poor quality software that will take longer to deliver.
  • The consequences of poor design decisions multiply rapidly.
  • It will usually take multiple attempts to arrive at a viable design.
  • You  should make it easy to throw away code and start again.
  • Latency kills. Short feedback loops to measurable outcomes create good software.
  • Estimates are guess-timates; they are mostly useless. There is a geometric relationship between the length of an estimate and its inaccuracy.
  • Software does not scale. Software teams do not scale. Architecture should be as much about enabling small teams to work on small components as the technical requirements of the software.

Because the technical and motivational aspects of software development are so key, I’m very intrigued by the zero-management approaches of organisations such as Valve and GitHub. I thoroughly recommend reading the Valve employee handbook and Michael Abrash’s blog.  Maybe that’s the way forward? The original agile manifesto was very much about self organizing teams, it would be great if we could get back to that. In the meantime, the word ‘agile’ has become so abused, that we should stop using it.

bellware-bury-agile

How To Add Images To A GitHub Wiki

$
0
0

Every GitHub repository comes with its own wiki. This is a great place to put the documentation for your project. What isn’t clear from the wiki documentation is how to add images to your wiki. Here’s my step-by-step guide. I’m going to add a logo to the main page of my WikiDemo repository’s wiki:

https://github.com/mikehadlow/WikiDemo/wiki/Main-Page

First clone the wiki. You grab the clone URL from the button at the top of the wiki page.

wiki-pic-clone

$ git clone git@github.com:mikehadlow/WikiDemo.wiki.git
Cloning into 'WikiDemo.wiki'...
Enter passphrase for key '/home/mike.hadlow/.ssh/id_rsa':
remote: Counting objects: 6, done.
remote: Compressing objects: 100% (3/3), done.
remote: Total 6 (delta 0), reused 0 (delta 0)
Receiving objects: 100% (6/6), done.

If you look in the cloned wiki’s repository you’ll see your pages as markdown files:

$ cd WikiDemo.wiki/

$ ls -l
total 2
-rw-r--r--+ 1 mike.hadlow Domain Users 29 Mar 20 10:29 Home.md
-rw-r--r--+ 1 mike.hadlow Domain Users 27 Mar 20 10:29 Main-Page.md

$ cat Main-Page.md
Hello this is the main page
$ cat Home.md
Welcome to the WikiDemo wiki!


Create a new directory called ‘images’ (it doesn’t matter what you call it, this is just a convention I use):

$ mkdir images

Then copy your picture(s) into the images directory (I’ve copied my logo_design.png file to my images directory).

$ ls -l
-rwxr-xr-x 1 mike.hadlow Domain Users 12971 Sep 5 2013 logo_design.png

Commit your changes and push back to GitHub:

$ git add -A

$ git status
# On branch master
# Changes to be committed:
# (use "git reset HEAD <file>..." to unstage)
#
# new file: images/logo_design.png
#

$ git commit -m "Added logo_design.png"
[master 23a1b4a] Added logo_design.png
1 files changed, 0 insertions(+), 0 deletions(-)
create mode 100755 images/logo_design.png

$ git push
Enter passphrase for key '/home/mike.hadlow/.ssh/id_rsa':
Counting objects: 5, done.
Delta compression using up to 4 threads.
Compressing objects: 100% (3/3), done.
Writing objects: 100% (4/4), 9.05 KiB, done.
Total 4 (delta 0), reused 0 (delta 0)
To git@github.com:mikehadlow/WikiDemo.wiki.git
333a516..23a1b4a master -> master

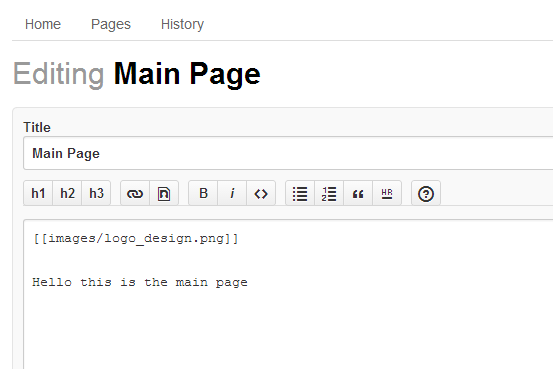
Now we can put a link to our image in ‘Main Page’:

wiki-images-edit-page

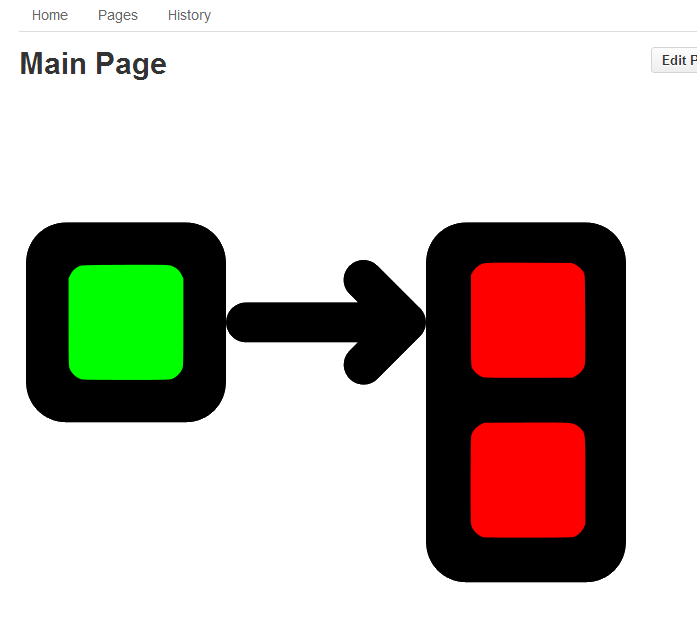
Save and there’s your image for all to see:

wiki-pic-result

Docker: Bulk Remove Images and Containers

$
0
0

I’ve just started looking at Docker. It’s a cool new technology that has the potential to make the management and deployment of distributed applications a great deal easier. I’d very much recommend checking it out. I’m especially interested in using it to deploy Mono applications because it promises to remove the hassle of deploying and maintaining the mono runtime on a multitude of Linux servers.

I’ve been playing around creating new images and containers and debugging my Dockerfile, and I’ve wound up with lots of temporary containers and images. It’s really tedious repeatedly running ‘docker rm’ and ‘docker rmi’, so I’ve knocked up a couple of bash commands to bulk delete images and containers.

Delete all containers:

sudo docker ps -a -q | xargs -n 1 -I {} sudo docker rm {}

Delete all un-tagged (or intermediate) images:

sudo docker rmi $( sudo docker images | grep '<none>' | tr -s ' ' | cut -d ' ' -f 3)


A Docker ‘Hello World' With Mono

$
0
0

Docker is a lightweight virtualization technology for Linux that promises to revolutionize the deployment and management of distributed applications. Rather than requiring a complete operating system, like a traditional virtual machine, Docker is built on top of Linux containers, a feature of the Linux kernel, that allows light-weight Docker containers to share a common kernel while isolating applications and their dependencies.

There’s a very good Docker SlideShare presentation here that explains the philosophy behind Docker using the analogy of standardized shipping containers. Interesting that the standard shipping container has done more to create our global economy than all the free-trade treaties and international agreements put together.

A Docker image is built from a script, called a ‘Dockerfile’. Each Dockerfile starts by declaring a parent image. This is very cool, because it means that you can build up your infrastructure from a layer of images, starting with general, platform images and then layering successively more application specific images on top. I’m going to demonstrate this by first building an image that provides a Mono development environment, and then creating a simple ‘Hello World’ console application image that runs on top of it.

Because the Dockerfiles are simple text files, you can keep them under source control and version your environment and dependencies alongside the actual source code of your software. This is a game changer for the deployment and management of distributed systems. Imagine developing an upgrade to your software that includes new versions of its dependencies, including pieces that we’ve traditionally considered the realm of the environment, and not something that you would normally put in your source repository, like the Mono version that the software runs on for example. You can script all these changes in your Dockerfile, test the new container on your local machine, then simply move the image to test and then production. The possibilities for vastly simplified deployment workflows are obvious.

Docker brings concerns that were previously the responsibility of an organization’s operations department and makes them a first class part of the software development lifecycle. Now your infrastructure can be maintained as source code, built as part of your CI cycle and continuously deployed, just like the software that runs inside it.

Docker also provides docker index, an online repository of docker images.  Anyone can create an image and add it to the index and there are already images for almost any piece of infrastructure you can imagine. Say you want to use RabbitMQ, all you have to do is grab a handy RabbitMQ images such as https://index.docker.io/u/tutum/rabbitmq/ and run it like this:

docker run -d -p 5672:5672 -p 55672:55672 tutum/rabbitmq

The –p flag maps ports between the image and the host.

Let’s look at an example. I’m going to show you how to create a docker image for the Mono development environment and have it built and hosted on the docker index. Then I’m going to build a local docker image for a simple ‘hello world’ console application that I can run on my Ubuntu box.

First we need to create a Docker file for our Mono environment. I’m going to use the Mono debian packages from directhex. These are maintained by the official Debian/Ubuntu Mono team and are the recommended way of installing the latest Mono versions on Ubuntu.

Here’s the Dockerfile:

#DOCKER-VERSION 0.9.1
#
#VERSION 0.1
#
# monoxide mono-devel package on Ubuntu 13.10

FROM ubuntu:13.10
MAINTAINER Mike Hadlow <mike@suteki.co.uk>

RUN sudo DEBIAN_FRONTEND=noninteractive apt-get install -y -q software-properties-common
RUN sudo add-apt-repository ppa:directhex/monoxide -y
RUN sudo apt-get update
RUN sudo DEBIAN_FRONTEND=noninteractive apt-get install -y -q mono-devel

Notice the first line (after the comments) that reads, ‘FROM  ubuntu:13.10’. This specifies the parent image for this Dockerfile. This is the official docker Ubuntu image from the index. When I build this Dockerfile, that image will be automatically downloaded and used as the starting point for my image.

But I don’t want to build this image locally. Docker provide a build server linked to the docker index. All you have to do is create a public GitHub repository containing your dockerfile, then link the repository to your profile on docker index. You can read the documentation for the details.

The GitHub repository for my Mono image is at https://github.com/mikehadlow/ubuntu-monoxide-mono-devel. Notice how the Docker file is in the root of the repository. That’s the default location, but you can have multiple files in sub-directories if you want to support many images from a single repository.

Now any time I push a change of my Dockerfile to GitHub, the docker build system will automatically build the image and update the docker index. You can see image listed here: https://index.docker.io/u/mikehadlow/ubuntu-monoxide-mono-devel/

I can now grab my image and run it interactively like this:

$ sudo docker pull mikehadlow/ubuntu-monoxide-mono-devel
Pulling repository mikehadlow/ubuntu-monoxide-mono-devel
f259e029fcdd: Download complete
511136ea3c5a: Download complete
1c7f181e78b9: Download complete
9f676bd305a4: Download complete
ce647670fde1: Download complete
d6c54574173f: Download complete
6bcad8583de3: Download complete
e82d34a742ff: Download complete

$ sudo docker run -i mikehadlow/ubuntu-monoxide-mono-devel /bin/bash
mono --version
Mono JIT compiler version 3.2.8 (Debian 3.2.8+dfsg-1~pre1)
Copyright (C) 2002-2014 Novell, Inc, Xamarin Inc and Contributors. www.mono-project.com
TLS: __thread
SIGSEGV: altstack
Notifications: epoll
Architecture: amd64
Disabled: none
Misc: softdebug
LLVM: supported, not enabled.
GC: sgen
exit

Next let’s create a new local Dockerfile that compiles a simple ‘hello world’ program, and then runs it when we run the image. You can follow along with these steps. All you need is a Ubuntu machine with Docker installed.

First here’s our ‘hello world’, save this code in a file named hello.cs:

using System;

namespace Mike.MonoTest
{
public class Program
{
public static void Main()
{
Console.WriteLine("Hello World");
}
}
}

Next we’ll create our Dockerfile. Copy this code into a file called ‘Dockerfile’:

#DOCKER-VERSION 0.9.1

FROM mikehadlow/ubuntu-monoxide-mono-devel

ADD . /src

RUN mcs /src/hello.cs
CMD ["mono", "/src/hello.exe"]

Once again, notice the ‘FROM’ line. This time we’re telling Docker to start with our mono image. The next line ‘ADD . /src’, tells Docker to copy the contents of the current directory (the one containing our Dockerfile) into a root directory named ‘src’ in the container. Now our hello.cs file is at /src/hello.cs in the container, so we can compile it with the mono C# compiler, mcs, which is the line ‘RUN mcs /src/hello.cs’. Now we will have the executable, hello.exe, in the src directory. The line ‘CMD [“mono”, “/src/hello.exe”]’ tells Docker what we want to happen when the container is run: just execute our hello.exe program.

As an aside, this exercise highlights some questions around what best practice should be with Docker. We could have done this in several different ways. Should we build our software independently of the Docker build in some CI environment, or does it make sense to do it this way, with the Docker build as a step in our CI process? Do we want to rebuild our container for every commit to our software, or do we want the running container to pull the latest from our build output? Initially I’m quite attracted to the idea of building the image as part of the CI but I expect that we’ll have to wait a while for best practice to evolve.

Anyway, for now let’s manually build our image:

$ sudo docker build -t hello .
Uploading context 1.684 MB
Uploading context
Step 0 : FROM mikehadlow/ubuntu-monoxide-mono-devel
---> f259e029fcdd
Step 1 : ADD . /src
---> 6075dee41003
Step 2 : RUN mcs /src/hello.cs
---> Running in 60a3582ab6a3
---> 0e102c1e4f26
Step 3 : CMD ["mono", "/src/hello.exe"]
---> Running in 3f75e540219a
---> 1150949428b2
Successfully built 1150949428b2
Removing intermediate container 88d2d28f12ab
Removing intermediate container 60a3582ab6a3
Removing intermediate container 3f75e540219a

You can see Docker executing each build step in turn and storing the intermediate result until the final image is created. Because we used the tag (-t) option and named our image ‘hello’, we can see it when we list all the docker images:

$ sudo docker images
REPOSITORY TAG IMAGE ID CREATED VIRTUAL SIZE
hello latest 1150949428b2 10 seconds ago 396.4 MB
mikehadlow/ubuntu-monoxide-mono-devel latest f259e029fcdd 24 hours ago 394.7 MB
ubuntu 13.10 9f676bd305a4 8 weeks ago 178 MB
ubuntu saucy 9f676bd305a4 8 weeks ago 178 MB
...

Now let’s run our image. The first time we do this Docker will create a container and run it. Each subsequent run will reuse that container:

$ sudo docker run hello
Hello World

And that’s it.

Imagine that instead of our little hello.exe, this image contained our web application, or maybe a service in some distributed software. In order to deploy it, we’d simply ask Docker to run it on any server we like; development, test, production, or on many servers in a web farm. This is an incredibly powerful way of doing consistent repeatable deployments.

To reiterate, I think Docker is a game changer for large server side software. It’s one of the most exciting developments to have emerged this year and definitely worth your time to check out.

A Contractor’s Guide To Recruitment Agencies

$
0
0

I haven’t contracted through an agency for a long time, but I thought I’d write up my experiences from almost ten years of working as an IT contractor for anyone considering it as a career choice.

IT recruitment agencies provide a valuable service. Like any middle-man, their job is to bring buyers and sellers together. In this case the buyer is the end client, the company that needs a short-term resource to fill a current skills gap. The seller is you, the contactor offering the skill. The agency needs to do two things well: market intelligence - finding clients in need of resources and contractors looking to sell their skills; and negotiation – negotiating the highest price that the client will pay, and the lowest price that the contractor will work for. The agency’s income is a simple formula:

(client rate – contractor rate) * number of contractors placed.

Minimize the contractor rate, maximize the client rate, and place as many contractors as possible. That’s success.

Anyone with a phone can set themselves up as a recruitment agency. There are zero or low startup costs. The greatest difficultly most agencies face is finding clients. Finding contractors is a little easier, as I’ll explain presently. Having a good relationship with a large corporate or government client is a gold standard for any agency. Even better if that relationship is exclusive. Getting a foot in the door with one of these clients is very difficult, usually some long established, large agency has long ago stitched up a deal with someone high-up. But any company or organization in need of a contractor is a potential client, and agencies spend inordinate amounts of time in the search for names they can approach with potential candidates.

As I said before, finding contractors is somewhat easier. There are a number of well known websites, Jobserve is the most common one to use in the UK, so it’s merely a case of putting up a job description and waiting for the CVs to roll in. The agent will try to make the job sound as good as possible to maximize the chances of getting applications within the limits of the client’s job spec.

An ideal contractor for an agency is someone who the client wants to hire, and who is willing to work for the lowest possible rate, and who will keep the client happy by turning up every day and doing the work that the client expects. Since agencies take an on-going percentage of the daily rate, the longer the contract lasts the better. The agency will attempt to do some filtering to ‘add value’, but since few agencies have any real technology knowledge, this mainly consists of matching keywords and years-of-experience. Anyone with any experience of talking to agencies will know how frustrating it can be, “Do you know any ASPs?” “No, they don’t want .NET, they want C#.” I’m not making those quotes up. Ideally they will want to persuade the client that they have some kind of exclusive arrangement with ‘their’ contractors and that the client would not be able to hire them through anyone else. It can be very embarrassing for them if the client receives your CV through a competing agency as well as theirs.

The job hunt. How you should approach it.

Let’s say you’re a competent C# developer, how should you approach landing your dream contract role? The obvious first place to look are the popular jobsites. Do a search for C# contracts in your local area, or further afield if you’re willing to travel. Scan the job listings looking for anything that looks like it vaguely fits. Don’t be too fussy at this stage, you want to increase your chances by applying for as many jobs as possible. Once you’ve got a list of jobs it’s worth trying to see if you can work out who the company is. If you can make a direct contract with the client, so much the better. Don’t worry about feeling underhand, agencies do this to each other all the time, it’s part of the game.

Failing a direct contact, the next step is to email your CV to the agency. Remember they’ll be trying to match keywords, so it’s worth customizing your CV to the job advert. Make sure as many keywords as possible match those in the advert, remembering of course that you might have to back up your claims in an interview.

The next step is usually a short telephone conversation with the recruiter. This call is the beginning of the negotiations with the recruiter. Negotiating is their full time job, they are usually very good at it. Be very wary. Your attitude is that you are a highly qualified professional who is somewhat interested in the role, but it’s by no means the only possibility at this stage. Whatever you do, don’t appear desperate. Remember at this stage you are an unknown quantity. Most contractors a recruiter comes into contact with will be duds (there’s no barriers to entry in our profession either), and they will initially be suspicious of you. Confidently assert that you have all the experience you mention in your CV, and that, of course, you can do the job. There is no point in getting into any technical discussion with the recruiter, they simply won’t understand. Remember: match keywords and experience. At this stage, even if you’ve got doubts about the job, don’t express them, just appear keen and confident.

Sometimes there’s a rate mentioned on the advert, at other times it will just say ‘market rates’, which is meaningless. If the agent doesn’t bring up rates at this point, there’s no need to mention them. At this stage you are still an unknown quantity. Once the client has decided that they really want you, you are gold, and in a much stronger bargaining position. If there’s a rate conversation at the pre interview stage, try to stay non-committal. If there’s a range, say you’ll only work for the top number.

They may ask you for references. Your reply should be to politely say that you only give references after an interview. It’s a common trick to put an imaginary job on a jobsite then ask applicants for references. Remember, an agency’s main difficulty is finding clients and the references are used as leads. If you give them references you will never hear from them again, but your previous clients will be hounded with phone calls.

Another common trick is to ask you where else you are applying. They are looking for leads again. Be very non-committal. They may also ask you for names of people you worked for at previous jobs, this is just like asking for references, you don’t need to tell them. Sometimes it’s worth have a list of made up names to give out if they’re very persistent.

Next you will either hear back from the agent with an offer of an interview, or you won’t hear from them at all. No agency I’ve ever had contact with bothered to call me giving a reason why an interview hadn’t materialized. If you don’t hear from them, move on with applying for the next job. Constantly calling the agency smacks of desperation and won’t get you anywhere. There are multiple possible reasons that the interview didn’t materialize, the most common being that the job didn’t exist in the first place (see above).

At all times be polite and professional with the agent even if you’re convinced they’re being liberal with the truth.

If you get an interview, that’s good. This isn’t a post about interviewing, so let’s just assume that you were wonderful and the client really wants you. You’ll know this because you’ll get a phone call from the agent congratulating you on getting the role. You are now a totally different quantity in the agent’s eyes, a successful candidate, a valuable commodity, a guaranteed income stream for as long as the contract lasts. Their main job now is to get you to work for as little as possible while the client pays as much as possible. If you agreed a rate before the interview, now is their chance to try and lower it. You may well have a conversation like this: “I’m very sorry John, but the client is not able to offer the rate we agreed, I’m afraid it will have to be XXX instead.” Call their bluff. Your answer should be: “Oh that’s such a shame, I was really looking forward to working with them, but I my minimum rate is <whatever you initially agreed>. Never mind, it was nice doing business with you.” I guarantee they will call you back the next day telling you how hard they have been working on your behalf to persuade the client to increase your rate.

If you haven’t already agreed a rate, now is the time to have a good idea of the minimum you want to work for. Add 30% to it. That’s your opening rate with the agent. They will choke and tell you there’s no way that you’ll get that. Ask them for their maximum and choke in return. Haggle back and forth until you discover what their maximum is. If it’s lower than your minimum, walk away. You may have to walk away and wait for them to phone you. Of course you’ve got to be somewhere in the ballpark of the market rate or you won’t get the role. Knowing the market rate is tricky, but a few conversations with your contractor mates should give you some idea.

Once the rate has been agreed and you start work your interests are aligned with the agent. You both want the contract to last and and you both want to maintain a good relationship with the client. The agency should pay you promptly. Don’t put up with late or missing payments, just leave. Usually a threat to walk off site can work wonders with outstanding invoices. Beware, at the worst some agents can be downright nasty and bullying. I’ve been told that would never work in IT again by at least two different characters. It’s nice to see how that turned out. Just ignore bullies, except to make a note that you will never work for their agency again.

Agencies are a necessary evil until you have built up a good enough network and reputation that you don’t need to use them any more. Some are professional and honest, many aren’t, but if you understand their motivations and treat anything they say with a pinch of salt, you should be fine.

JSON Web Tokens, OWIN, and AngularJS

$
0
0

I’m working on an exciting new project at the moment. The main UI element is a management console built with AngularJS that communicates with a HTTP/JSON API built with NancyFX and hosted using the KatanaOWIN self host. I’m quite new to this software stack, having spent the last three years buried in SOA and messaging, but so far it’s all been a joy to work with. AngularJS makes building single page applications so easy, even for a newbie like me, that it almost feels unfair. I love the dependency injection, templating and model binding, and the speed with which you can get up and running. On the server side, NancyFx is perfect for building HTTP/JSON APIs. I really like the design philosophy behind it. The built-in dependency injection, component oriented design, and convention-over-configuration, for example, is exactly how I like build software. OWIN is a huge breakthrough for C# web applications. Decoupling the web server from the web framework is something that should have happened a long time ago, and it’s really nice to finally say goodbye to ASP.NET.

Rather than using cookie based authentication, I’ve decided to go with JSON Web Tokens (JWT). This is a relatively new authorization standard that uses a signed token, transmitted in a request header, rather than the traditional ASP.NET cookie based authorization.

There are quite a few advantages to JWT:

  • Cross Domain API calls. Because it’s just a header rather than a cookie, you don’t have any of the cross-domain browser problems that you get with cookies. It makes implementing single-sign-on much easier because the app that issues the token doesn’t need to be in any way connected with the app that consumes it. They merely need to have access to the same shared secret encryption key.
  • No server affinity. Because the token contains all the necessary user identification, there’s no for shared server state – a call to a database or shared session store.
  • Simple to implement clients. It’s easy to consume the API from other servers, or mobile apps.

So how does it work? The JWT token is a simple string of three ‘.’ separated base 64 encoded values:

<header>.<payload>.<hash>

Here’s an example:

eyJ0eXAiOiJKV1QiLCJhbGciOiJIUzI1NiJ9.eyJ1c2VyIjoibWlrZSIsImV4cCI6MTIzNDU2Nzg5fQ.KG-ds05HT7kK8uGZcRemhnw3er_9brQSF1yB2xAwc_E

The header and payload are simple JSON strings. In the example above the header looks like this:

{ "typ": "JWT", "alg": "HMACSHA256" }

This is defined in the JWT standard. The ‘typ’ is always ‘JWT’, and the ‘alg’ is the hash algorithm used to sign the token (more on this later).

The payload can be any valid JSON, although the standard does define some keys that client and server libraries should respect:

{
"user": "mike",
"exp": 123456789
}

Here, ‘user’ is a key that I’ve defined, ‘exp’ is defined by the standard and is the expiration time of the token given as a UNIX time value. Being able to pass around any values that are useful to your application is a great benefit, although you obviously don’t want the token to get too large.

The payload is not encrypted, so you shouldn’t put sensitive information it in. The standard does provide an option for encrypting the JWT inside an encrypted wrapper, but for most applications that’s not necessary. In my case, an attacker could get the user of a session and the expiration time, but they wouldn’t be able to generate new tokens without the server side shared-secret.

The token is signed by taking the header and payload, base  64 encoding them, concatenating with ‘.’ and then generating a hash value using the given algorithm. The resulting byte array is also base 64 encoded and concatenated to produce the complete token. Here’s some code (taken from John Sheehan’s JWT project on GitHub) that generates a token. As you can see, it’s not at all complicated:

/// <summary>
/// Creates a JWT given a payload, the signing key, and the algorithm to use.
/// </summary>
/// <param name="payload">An arbitrary payload (must be serializable to JSON via <see cref="System.Web.Script.Serialization.JavaScriptSerializer"/>).</param>
/// <param name="key">The key bytes used to sign the token.</param>
/// <param name="algorithm">The hash algorithm to use.</param>
/// <returns>The generated JWT.</returns>
publicstaticstring Encode(object payload, byte[] key, JwtHashAlgorithm algorithm)
{
var segments = new List<string>();
var header = new { typ = "JWT", alg = algorithm.ToString() };

byte[] headerBytes = Encoding.UTF8.GetBytes(jsonSerializer.Serialize(header));
byte[] payloadBytes = Encoding.UTF8.GetBytes(jsonSerializer.Serialize(payload));

segments.Add(Base64UrlEncode(headerBytes));
segments.Add(Base64UrlEncode(payloadBytes));

var stringToSign = string.Join(".", segments.ToArray());

var bytesToSign = Encoding.UTF8.GetBytes(stringToSign);

byte[] signature = HashAlgorithms[algorithm](key, bytesToSign);
segments.Add(Base64UrlEncode(signature));

returnstring.Join(".", segments.ToArray());
}

Implementing JWT authentication and authorization in NancyFx and AngularJS

There are two parts to this: first we need a login API, that takes a username (email in my case) and a password and returns a token, and secondly we need a piece of OWIN middleware that intercepts each request and checks that it has a valid token.

The login Nancy module is pretty straightforward. I took John Sheehan’s code and pasted it straight into my project with a few tweaks, so it was just a question of taking the email and password from the request, validating them against my user store, generating a token and returning it as the response. If the email/password doesn’t validate, I just return 401:

using System;
using System.Collections.Generic;
using Nancy;
using Nancy.ModelBinding;
using MyApp.Api.Authorization;

namespace MyApp.Api
{
publicclass LoginModule : NancyModule
{
privatereadonlystring secretKey;
privatereadonly IUserService userService;

public LoginModule (IUserService userService)
{
Preconditions.CheckNotNull (userService, "userService");
this.userService = userService;

Post ["/login/"] = _ => LoginHandler(this.Bind<LoginRequest>());

secretKey = System.Configuration.ConfigurationManager.AppSettings ["SecretKey"];
}

public dynamic LoginHandler(LoginRequest loginRequest)
{
if (userService.IsValidUser (loginRequest.email, loginRequest.password)) {

var payload = new Dictionary<string, object> {
{ "email", loginRequest.email },
{ "userId", 101 }
};

var token = JsonWebToken.Encode (payload, secretKey, JwtHashAlgorithm.HS256);

returnnew JwtToken { Token = token };
} else {
return HttpStatusCode.Unauthorized;
}
}
}

publicclass JwtToken
{
publicstring Token { get; set; }
}

publicclass LoginRequest
{
publicstring email { get; set; }
publicstring password { get; set; }
}
}

On the AngularJS side, I have a controller that calls the LoginModule API. If the request is successful, it stores the token in the browser’s sessionStorage, it also decodes and stores the payload information in sessionStorage. To update the rest of the application, and allow other components to change state to show a logged in user, it sends an event (via $rootScope.$emit) and then redirects to the application’s root path. If the login request fails, it simply shows a message to inform the user:

myAppControllers.controller('LoginController', function ($scope, $http, $window, $location, $rootScope) {
$scope.message = '';
$scope.user = { email: '', password: '' };
$scope.submit = function () {
$http
.post('/api/login', $scope.user)
.success(function (data, status, headers, config) {
$window.sessionStorage.token = data.token;
var user = angular.fromJson($window.atob(data.token.split('.')[1]));
$window.sessionStorage.email = user.email;
$window.sessionStorage.userId = user.userId;
$rootScope.$emit("LoginController.login");
$location.path('/');
})
.error(function (data, status, headers, config) {
// Erase the token if the user fails to login
delete $window.sessionStorage.token;

$scope.message = 'Error: Invalid email or password';
});
};
});

Now that we have the JWT token stored in the browser’s sessionStorage, we can use it to ‘sign’ each outgoing API request. To do this we create an interceptor for Angular’s http module. This does two things: on the outbound request it adds an Authorization header ‘Bearer <token>’ if the token is present. This will be decoded by our OWIN middleware to authorize each request. The interceptor also checks the response. If there’s a 401 (unauthorized) response, it simply bumps the user back to the login screen.

myApp.factory('authInterceptor', function ($rootScope, $q, $window, $location) {
return {
request: function (config) {
config.headers = config.headers || {};
if($window.sessionStorage.token) {
config.headers.Authorization = 'Bearer ' + $window.sessionStorage.token;
}
return config;
},
responseError: function (response) {
if(response.status === 401) {
$location.path('/login');
}
return $q.reject(response);
}
};
});

myApp.config(function ($httpProvider) {
$httpProvider.interceptors.push('authInterceptor');
});

The final piece is the OWIN middleware that intercepts each request to the API and validates the JWT token.

We want some parts of the API to be accessible without authorization, such as the login request and the API root, so we maintain a list of exceptions, currently this is just hard-coded, but it could be pulled from some configuration store. When the request comes in, we first check if the path matches any of the exception list items. If it doesn’t we check for the presence of an authorization token. If the token is not present, we cancel the request processing (by not calling the next AppFunc), and return a 401 status code. If we find a JWT token, we attempt to decode it. If the decode fails, we again cancel the request and return 401. If it succeeds, we add some OWIN keys for the ‘userId’ and ‘email’, so that they will be accessible to the rest of the application and allow processing to continue by running the next AppFunc.

using System;
using System.Collections.Generic;
using System.Threading.Tasks;

namespace MyApp.Api.Authorization
{
using AppFunc = Func<IDictionary<string, object>, Task>;

/// <summary>
/// OWIN add-in module for JWT authorization.
/// </summary>
publicclass JwtOwinAuth
{
privatereadonly AppFunc next;
privatereadonlystring secretKey;
privatereadonly HashSet<string> exceptions = new HashSet<string>{
"/",
"/login",
"/login/"
};

public JwtOwinAuth (AppFunc next)
{
this.next = next;
secretKey = System.Configuration.ConfigurationManager.AppSettings ["SecretKey"];
}

public Task Invoke(IDictionary<string, object> environment)
{
var path = environment ["owin.RequestPath"] asstring;
if (path == null) {
thrownew ApplicationException ("Invalid OWIN request. Expected owin.RequestPath, but not present.");
}
if (!exceptions.Contains(path)) {
var headers = environment ["owin.RequestHeaders"] as IDictionary<string, string[]>;
if (headers == null) {
thrownew ApplicationException ("Invalid OWIN request. Expected owin.RequestHeaders to be an IDictionary<string, string[]>.");
}
if (headers.ContainsKey ("Authorization")) {
var token = GetTokenFromAuthorizationHeader (headers ["Authorization"]);
try {
var payload = JsonWebToken.DecodeToObject (token, secretKey) as Dictionary<string, object>;
environment.Add("myapp.userId", (int)payload["userId"]);
environment.Add("myapp.email", payload["email"].ToString());
} catch (SignatureVerificationException) {
return UnauthorizedResponse (environment);
}
} else {
return UnauthorizedResponse (environment);
}
}
return next (environment);
}

publicstring GetTokenFromAuthorizationHeader(string[] authorizationHeader)
{
if (authorizationHeader.Length == 0) {
thrownew ApplicationException ("Invalid authorization header. It must have at least one element");
}
var token = authorizationHeader [0].Split (' ') [1];
return token;
}

public Task UnauthorizedResponse(IDictionary<string, object> environment)
{
environment ["owin.ResponseStatusCode"] = 401;
return Task.FromResult (0);
}
}
}

So far this is all working very nicely. There are some important missing pieces. I haven’t implemented an expiry key in the JWT token, or expiration checking in the OWIN middleware. When the token expires, it would be nice if there was some algorithm that decides whether to simply issue a new token, or whether to require the user to sign-in again. Security dictates that tokens should expire relatively frequently, but we don’t want to inconvenience the user by asking them to constantly sign in.

JWT is a really nice way of authenticating HTTP/JSON web APIs. It’s definitely worth looking at if you’re building single page applications, or any API-first software.
Heisenberg Developers

$
0
0

TL:DR You can not observe a developer without altering their behavior.

image

First a story.

Several years ago I worked on a largish project as one of a team of developers. We were building an internal system to support an existing business process. Initially things went very well. The user requirements were reasonably well defined and we worked effectively iterating on the backlog. We were mostly left to our own devices. We had a non-technical business owner and a number of potential users who gave us broad objectives, and who tested features as they became available. When we felt that piece needed refactoring, we spent the time to do it. When a pain point appeared in the software we changed the design to remove it. We didn’t have to ask permission to do any of things, so long features appeared at reasonable intervals, everyone was happy.

Then came that requirement. The one where you try to replace an expert user’s years of experience and intuition with software. What started out as a vague and wooly requirement, soon became a monster as we started to dig into it. We tried to push back against it, or at least get it scheduled for a later version of the software to be delivered at some unspecified time in future. But no, the business was insistent, they wanted it in the next version. A very clever colleague thought the problem could be solved with a custom DSL that would allow the users themselves to encode their business rules and he and another guy set to work building it. Several months later, he was still working on it. The business was frustrated by the lack of progress and the vaguely hoped for project delivery dates began to slip. It was all a bit of a mess.

The boss looked at this and decided that we were loose cannons and the ship needed tightening up. He hired a project manager with an excellent CV and a reputation for getting wayward software projects under control. He introduced us to ‘Jira’, a word that strikes fear into the soul of a developer. Now, rather than taking a high level requirement and simply delivering it at some point in the future, we would break the feature into finely grained tasks, estimate each of the tasks, then break the tasks into finer grained tasks if the estimate was more than a day’s work. Every two weeks we would have a day long planning meeting where these tasks were defined. We then spent the next 8 days working on the tasks and updating Jira with how long each one took. Our project manager would be displeased when tasks took longer than the estimate and would immediately assign one of the other team members to work with the original developer to hurry it along. We soon learned to add plenty of contingency to our estimates. We were delivery focused. Any request to refactor the software was met with disapproval, and our time was too finely managed to allow us refactor ‘under the radar’.

Then a strange thing started to happen. Everything slowed.

Of course we had no way to prove it because there was no data from ‘pre-PM’ to compare to ‘post-PM’, but there was a noticeable downward notch in the speed at which features were delivered. With his calculations showing that the project’s delivery date was slipping, our PM did the obvious thing and started hiring more developers, I think they were mostly people he’d worked with before. We, the existing team had very little say in who was hired, and it did seem that there was something of a cultural gap between us and the new guys. Whenever there was any debate about refactoring the code, or backing out of a problematic feature, the new guys would argue against it, saying it was ‘ivory tower’, and not delivering features. The PM would veto the work and side with the new guys.

We became somewhat de-motivated. After loosing an argument about how things should be done more than a few times, you start to have a pretty clear choice: knuckle down, don’t argue and get paid, or leave. Our best developer, the DSL guy, did leave, and the ones of us arguing for good design lost one of our main champions. I learnt to inflate my estimates, do what I was told to do, and to keep my imagination and creativity for my evening and weekend projects. I found it odd that few of my new colleagues seemed to actually enjoy software development, the talk in our office was now more about cars than programming languages. They actually seemed to like the finely grained management. As one explained to me, “you take the next item off the list, do the work, check it in, and you don’t have to worry about it.” It relieved them of the responsibility to make difficult decisions, or take a strategic view.

The project was not a happy one. Features took longer and longer to be delivered. There always seemed to be a mounting number of bugs, few of which seemed to get fixed, even as the team grew. The business spent more and more money for fewer and fewer benefits.

Why did it all go so wrong?

Finely grained management of software developers is compelling to a business. Any organization craves control. We want to know what we are getting in return for those expensive developer salaries. We want to be able to accurately estimate the time taken to deliver a system in order to do an effective cost-benefit analysis and to give the business an accurate forecast of delivery. There’s also the hope that by building an accurate database of estimates verses actual effort, we can fine tune our estimation, and by analysis find efficiencies in the software development process.

The problem with this approach is that it fundamentally misunderstands the nature of software development. That it is a creative and experimental process. Software development is a complex system of multiple poorly understood feedback loops and interactions. It is an organic process of trial and error, false starts, experiments and monumental cock-ups. Numerous studies have shown that effective creative work is best done by motivated autonomous experts. As developers we need to be free to try things out, see how they evolve, back away from bad decisions, maybe try several different things before we find one that works. We don’t have hard numbers for why we want to try this or that, or why we want to stop in the middle of this task and throw away everything we’ve done. We can’t really justify all our decisions, many them are hunches, many of them are wrong.

If you ask me how long a feature is going to take, my honest answer is that I really have no idea. I may have a ball-park idea, but there’s a long-tail of lower-probability possibilities, that mean that I could easily be out by a factor of 10. What about the feature itself? Is it really such a good idea? I’m not just the implementer of this software, I’m a stake holder too. What if there’s a better way to address this business requirement? What if we discover a better way half way through the estimated time? What if I suddenly stumble on a technology or a technique that could make a big difference to the business? What if it’s not on the road map?

As soon as you ask a developer to tell you exactly what he’s going to do over the next 8 days (or worse weeks or months), you kill much of the creativity and serendipity. You may say that he is free to change the estimates or the tasks at any time, but he will still feel that he has to at least justify the changes. The more finely grained the tasks, the more you kill autonomy and creativity. No matter how much you say it doesn’t matter if he doesn’t meet his estimates, he’ll still feel bad about it. His response to being asked for estimates is twofold: first, he will learn to put in large contingencies, just in case one of those rabbit-holes crosses his path; second, he will look for the quick fix, the hack that just gets the job done. Damn technical debt, that’s for the next poor soul to deal with, I must meet my estimate. Good developers are used to doing necessary, but hard to justify work ‘under the radar’, they effectively lie to management about what they are really doing, but finely grained management makes it hard to steal the time in which to do it.

To be clear, I’m not speaking for everyone here. Not all developers dislike micromanagement. Some are more attracted to the paycheck than the art. For them, micromanagement can be very attractive. So long as you know how to work the system you can happily submit inflated estimates, just do what you’re told, and check in the feature. If users are unhappy and the system is buggy and late, you are not to blame, you just did what you were told.

Finely grained management is a recipe for ‘talent evaporation’. The people who live and breathe software will leave – they usually have few problems getting jobs elsewhere. The people who don’t like to take decisions and need an excuse, will stay. You will find yourself with a compliant team that meekly carries out your instructions, doesn’t argue about the utility of features, fills in Jira correctly, meets their estimates, and produces very poor quality software.

So how should one manage developers?

Simple: give them autonomy. It seems like a panacea, but finely grained management is poisonous for software development. It’s far better to give high level goals and allow your developers to meet them as they see fit. Sometimes they will fail; you need to build in contingency for this. But don’t react to failure by putting in more process and control. Work on building a great team that you can trust and that can contribute to success rather than employing rooms full of passive code monkeys.

Hire Me

$
0
0

I’m on a sales drive. I want to move away from daily-rate contracting, and focus on full-lifecycle project delivery. I’ve created a new website to help market myself http://mikehadlow.com/. I’m looking for customers who want software written to a specification for a fixed price.

Screen Shot 2014-07-03 at 14.49.11

I’ve been working in IT since 1996, although I’ve played with computers and programming since I was a teenager. Except for the first two years when I had a permanent job, I’ve worked as a daily or hourly rate contractor, with just the occasional foray into fixed-price project work. Looking at my CV I can count 17 different organizations that  I’ve worked for during that time. Some of them where large companies where I was just a small part of a large team. For example, I was one of over a hundred contractors at one particular public sector project. Others were tiny local Brighton companies where I was often the end-to-end developer for a complete system. I’ve had a variety of roles, from being a travelling troubleshooter, driving around the country fixing installs of one particularly nasty system, a bug-fixer for months on end on a huge mission critical system, and a plug-n-play C# programmer on a whole range of different projects. More recently, for the last five years or so, I’ve mostly been hired in an ‘architect’ role. What this means is somewhat vague, but it usually encompasses giving higher-level strategic design direction and getting involved in team structure, process design, and planning. All this experience has given me some very strong opinions about what makes a successful software project. I hope that’s pretty obvious to anyone reading this blog. It’s also given me the confidence to take responsibility for the entire project lifecycle.

During this time I’ve also occasionally done fixed-price projects. The largest of these was a customer relationship management system for a pharmaceutical company, this was a six month project which I worked with a DBA to deliver. I’ve also built a property management system for a legal practice, and a complete eCommerce system that I’ve also maintained for the last six years. I always enjoyed these projects the most. It’s very satisfying to be able to deliver a working system to a client and see it really helping their business. The problem has been finding the work. I’m hoping now that the popularity of this blog and the success of EasyNetQ will provide enough of an audience for me that I’ll be able to do projects full time.

I want to move from being just an element of a project’s delivery, to being the person responsible for it.  Taking responsibility means delivering to a price and time-scale and creating and managing the team that does it. So if you have a requirement for bespoke software and you need a safe pair of hands to deliver it, please get in touch with me at mike@suteki.co.uk and let’s talk.

The Lava Layer Anti-Pattern

$
0
0

TL:DR Successive, well intentioned, changes to architecture and technology throughout the lifetime of an application can lead to a fragmented and hard to maintain code base. Sometimes it is better to favour consistent legacy technology over fragmentation.

An ‘anti-pattern’ describes a commonly encountered pathology or problem in software development. The Lava Layer (or Lava Flow) anti-pattern is well documented (here and here for example). It’s symptoms are a fragile and poorly understood codebase with a variety of different patterns and technologies used to solve the same problems in different places. I’ve seen this pattern many times in enterprise software. It’s especially prevalent in situations where the software is large, mission critical, long-lived and where there is high staff turn-over. In this post I want to show some of the ways that it occurs and how it’s often driven by a very human desire to improve the software.

To illustrate I’m going to tell a story about a fictional piece of software in a fictional organisation with made up characters, but closely based on real examples I’ve witnessed. In fact, if I’m honest, I’ve been several of these characters at different stages of my career.  I’m going to concentrate on the data-access layer (DAL) technology and design to keep the story simple, but the general principles and scenario can and do apply to any part of the software stack.

Let’s set the scene…

The Royal Churchill is a large hospital in southern England. It has a sizable in-house software team that develop and maintain a suite of applications that support the hospital’s operations. One of these is WidgetFinder, a physical asset management application that is used to track the hospital’s large collection of physical assets; everything from beds to CT scanners. Development on WidgetFinder was started in 2005. The software team that wrote version 1 was lead by Laurence Martell, an developer with may years experience building client server systems based on VB/SQL Server. VB was in the process of being retired by Microsoft, so Laurence decided to build WidgetFinder with the relatively new ASP.NET platform. He read various Microsoft design guideline papers and a couple of books and decided to architect the DAL around the ADO.NET RecordSet. He and his team hand coded the DAL and exposed DataSets directly to the UI layer, as was demonstrated in the Microsoft sample applications. After seven months of development and testing, Version 1 of WidgetFinder was released and soon became central to the Royal Churchill’s operations. Indeed, several other systems, including auditing and financial applications, soon had code that directly accessed WidgetFinders database.

Like any successful enterprise application, a new list of requirements and extensions evolved and budget was assigned for version 2. Work started in 2008. Laurence had left and a new lead developer had been appointed. His name was Bruce Snider. Bruce came from a Java background and was critical of many of Laurence’s design choices. He was especially scornful of the use of DataSets: “an un-typed bag of data, just waiting for a runtime error with all those string indexed columns.” Indeed WidgetFinder did seem to suffer from those kinds of errors. “We need a proper object-oriented model with C# classes representing tables, such as Asset and Location. We can code gen most of the DAL straight from the relational schema.” He asked for time and budget to rewrite WidgetFinder from scratch, but this was rejected by the management. Why would they want to re-write a two year old application that was, as far as they were concerned, successfully doing its job? There was also the problem that many other systems relied on WidgetFinder’s database and they would need to be re-written too.

Bruce decided to write the new features of WidgetFinder using his OO/Code Gen approach and refactor any parts of the application that they had to touch as part of version 2. He was confident that in time his Code Gen DAL would eventually replace the hand crafted DataSet code. Version 2 was released a few months later. Simon, a new recruit on the team asked why some of the DAL was code generated, and some of it hand-coded. It was explained that there had been this guy called Lawrence who had no idea about software, but he was long gone.

A couple of years went by. Bruce moved on and was replaced by Ina Powers. The code gen system had somewhat broken down after Bruce had left. None of the remaining team really understood how it worked, so it was easier just to modify the code by hand. Ina found the code confusing and difficult to reason about. “Why are we hand-coding the DAL in this way? This code is so repetitive, it looks like it was written by an automation. Half of it uses DataSets and the other some half baked Active Record pattern. Who wrote this crap? If you hand code your DAL, you are stealing from your employer. The only sensible solution is an ORM. I recommend that we re-write the system using a proper domain model and NHibernate.” Again the business rejected a rewrite. “No problem, we will adopt an evolutionary approach: write all the new code DDD/NHibernate style, and progressively refactor the existing code as we touch it.” Many months later, Version 3 was released.

Mandy was a new hire. She’d listened to Ina’s description of how the application was architected around DDD with the data access handled by NHibernate, so she was surprised and confused to come across some code using DataSets. She asked Simon what to do. “Yeah, I think that code was written by some guy who was here before me. I don’t really know what it does. Best not to touch it in case something breaks.”

Ina, frustrated by management who didn’t understand the difficulty of maintaining such horrible legacy applications, left for a start-up where she would be able to build software from scratch. She was replaced by Gordy Bannerman who had years of experience building large scale applications. The WidgetFinder users were complaining about it’s performance. Some of the pages took 30 seconds or more to appear. Looking at the code horrified him: Huge Linq statements generating hundreds of individual SQL requests, no wonder it was slow. Who wrote this crap? “ORMs are a horrible leaky abstraction with all kinds of performance problems. We should use a lightweight data-access technology like Dapper. Look at Stack-Overflow, they use it. They also use only static methods for performance, we should do the same.” And so the cycle repeated itself. Version 4 was released a year later. It was buggier than the previous versions. Gordy had dismissed Ina’s love of unit testing. It’s hard to unit test code written mostly with static methods.

Mandy left to be replaced by Peter. Simon introduced him to the WidgetFinder code. “It’s not pretty. A lot of different things have been tried over the years and you’ll find several different ways of doing the same thing depending on where you look. I don’t argue, just get on with trawling through the never ending bug list. Hey, at least it’s a job.”

This is a graphical representation of the DAL code over time. The Y-axis shows the version of the software. It starts with version one at the bottom and ends with version four at the top. The X-axis shows features, the older ones to the left and the newer ones to the right. Each technology choice is coloured differently. red is the hand-coded RecordSet DAL, blue the Active Record code gen, green DDD/NHibernate and Yellow is Dapper/Static methods.

LavaLayer

Each new design and technology choice never completely replaced the one that went before. The application has archaeological layers revealing it’s history and the different technological fashions taken up successively by Laurence, Bruce, Ina and Gordy. If you look along the Version 4 line, you can see that there are four different ways of doing the same thing scattered throughout the code base.

Each successive lead developer acted in good faith. They genuinely wanted to improve the application and believed that they were using the best design and technology to solve the problem at hand. Each wanted to re-write the application rather than maintain it, but the business owners would not allow them the resources to do it. Why should they when there didn’t seem to be any rational business reason for doing so? High staff turnover exacerbated the problem. The design philosophy of each layer was not effectively communicated to the next generation of developers. There was no consistent architectural strategy. Without exposition or explanation, code standing alone needs a very sympathetic interpreter to understand its motivations.

So how should one mitigate against Lava Layer? How can we approach legacy application development in a way that keeps the code consistent and well architected? A first step would be a little self awareness.

We developers should recognise that we suffer from a number of quite harmful pathologies when dealing with legacy code:

  • We are highly (and often overly) critical of older patterns and technologies. “You’re not using a relational database?!? NoSQL is far far better!” “I can’t believe this uses XML! So verbose! JSON would have been a much better choice.”
  • We think that the current shiny best way is the end of history; that it will never be superseded or seen to be suspect with hindsight.
  • We absolutely must ritually rubbish whoever came before us. Better still if they are no longer around to defend themselves. There’s a brilliant Dilbert cartoon for this.
  • We despise working on legacy code and will do almost anything to carve something greenfield out of an assignment, even if it makes no sense within the existing architecture.
  • Rather than try to understand legacy code, how it works and the motivations that created it, we throw up our hands in despair and declare that the whole thing needs to be rewritten.

If you find yourself suggesting a radical change to an existing application, especially if you use the argument that, “we will refactor it to the new pattern over time.” Consider that you may never complete that refactoring, and think about what the application will look like with two different ways of doing the same thing. Will this aid those coming after you, or hinder them? What happens if your way turns out to be sub-optimal? Will replacing it be easy? Or would it have been better to leave the older, but more consistent code in place? Is WidgetFinder better for having four entirely separate ways of getting data from the database to the UI, or would it have been easier to understand and maintain with one? Try and have some sympathy and understanding for those who came before you. There was probably a good reason for why things were done the way they were. Be especially sympathetic to consistency, even if you don’t necessarily agree with the design or technology choices.

Basic OWIN Self Host With F#

$
0
0

I’m still very much an F# noob, but yesterday I thought I’d use it to write a little stub web service for a project I’m currently working on. I simply want to respond to any POST request to my service. I don’t need routing, or any other ‘web framework’ pieces. I just wanted to use the Microsoft.AspNet.WebApi.OwinSelfHost package to create a little web service that runs inside a console program.

First create a new F# console project. Then install the self host package:

    Microsoft.AspNet.WebApi.OwinSelfHost

Note that this will also install various WebApi pieces which we don’t need here, so we can go ahead and uninstall them:

    uninstall-package Microsoft.AspNet.WebApi.OwinSelfHost
    uninstall-package Microsoft.AspNet.WebApi.Owin
    uninstall-package Microsoft.AspNet.WebApi.Core
    uninstall-package Microsoft.AspNet.WebApi.Client

My requirement is to simply take any POST request to the service, take the post body and transform it in some way (that’s not important here), and then return the result in the response body.

So first, here’s a function that takes a string and returns a string:

    let transform (input: string) =
        sprintf "%s transformed" input

Next we’ll write the OWIN start-up class. This needs to be a class with a single member, Configuration, that takes an IAppBuilder:

    open Owin
    open Microsoft.Owin
    open System
    open System.IO
    open System.Threading.Tasks

    type public Startup() = 
        member x.Configuration (app:IAppBuilder) = app.Use( ... ) |> ignore

We need something to pass into the Use method on IAppBuilder. The Use method looks like this:

    public static IAppBuilder Use(
        this IAppBuilder app,
        Func<IOwinContext, Func<Task>, Task> handler
    )

So we need a handler with the signature Func<IOwinContext, Func<Task>, Task>. Since F# lambdas cast directly to Func<..> delegates, we simply use lots of type annotations and write a function which looks like this:

    let owinHandler = fun (context:IOwinContext) (_:Func) -> 
        handleOwinContext context; 
        Task.FromResult(null) :> Task

Note that this is running synchronously. We’re just returning a completed task.

Now lets look at the handleOwinContext function. This simply takes the IOwinContext, grabs the request, checks that it’s a ‘POST’, and transforms the request stream into the response stream using our transform function:

    let handleOwinContext (context:IOwinContext) =

        use writer = new StreamWriter(context.Response.Body)

        match context.Request.Method with
        | "POST" -> 
            use reader = new StreamReader(context.Request.Body)
            writer.Write(transform(reader.ReadToEnd()))
        | _ ->
            context.Response.StatusCode <- 400
            writer.Write("Only POST")

Now all we need to do is register our Startup type with the OWIN self host in our Program.Main function:

open System
open Microsoft.Owin.Hosting

[]
let main argv = 

    let baseAddress = "http://localhost:8888"

    use application = WebApp.Start<Startup.Startup>(baseAddress)

    Console.WriteLine("Server running on {0}", baseAddress)
    Console.WriteLine("hit <enter> to stop")
    Console.ReadLine() |> ignore
    0

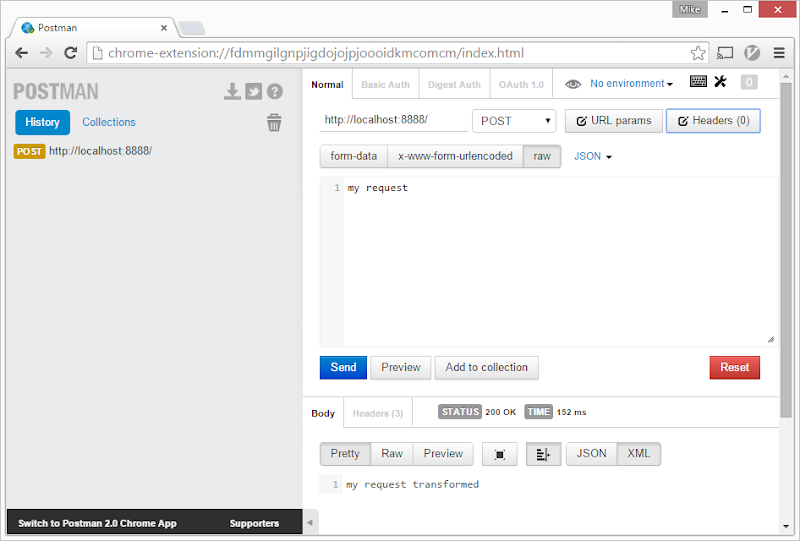
And we’re done. Now let’s try it out with the excellent Postman client, just run the console app and send a POST request to http://localhost:8888/:

Postman_owin_self_host_fsharp

Full source code in this Gist.


A Simple Nowin F# Example

$
0
0

In my last post I showed a simple F# OWIN self hosted server without an application framework. Today I want to show an even simpler example that doesn’t reference any of the Microsoft OWIN libraries, but instead uses an open source server implementation, Nowin. Thanks to Damien Hickey for pointing me in the right direction.

The great thing about the Open Web Interface for .NET (OWIN) is that it is simply a specification. There is no OWIN library that you have to install to allow web servers, application frameworks and middlewear built to the OWIN standard to communicate. There is no interface that they must implement. They simply need to provide an entry point for the OWIN application delegate (better know as the AppFunc):

    Func<IDictionary<string , object>, Task>

For simple applications, where we don’t need routing, authentication, serialization, or an application framework, this means we can simply provide our own implementation of the AppFunc and pass it directly to an OWIN web server.

Nowin, by Boris Letocha, is a .NET web server, built directly against the standard .NET socket API. This means it should work on all platforms that support .NET without modification. The author claims that it has equivalent performance to NodeJS on Windows and can even match HttpListener. Although not ready for production, it makes a compelling implementation for simple test servers and stubs, which is how I intend to use it.

To use any OWIN web server with F#, we simply need to provide an AppFunc and since F# lambdas have an implicit cast to System.Func<..> we can simply provide the AppFunc in the form:

    fun (env: IDictionary<string, obj>) -> Task.FromResult(null) :> Task

Let’s see it in action. First create an F# console application and install the Nowin server with NuGet:

    Install-Package Nowin

Now we can host our Nowin server in the application’s entry point:

    [<entrypoint>]
    let main argv = 

        use server = 
            Nowin.ServerBuilder
                .New()
                .SetEndPoint(new IPEndPoint(IPAddress.Any, port))
                .SetOwinApp(fun env -> Task.FromResult(null) :> Task)
                .Build()

        server.Start() 

        printfn "Server listening on http://localhost:%i/ \nhit <enter> to stop." port
        Console.ReadLine() |> ignore

        0

Of course this server does nothing at all. It simply returns the default 200 OK response with no body. To do any useful work you need to read the OWIN environment, understand the request and create a response. To make this easier in F# I’ve created a simple OwinEnvironment type with just the properties I need. You could expand this to encompass whatever OWIN environment properties you need. Just look at the OWIN spec for this.

    type OwinEnvironment = {
        httpMethod: string;
        requestBody: Stream;
        responseBody: Stream;
        setResponseStatusCode: (int -> unit);
        setResponseReasonPhrase: (string -> unit)
    }

Here is a function that takes the AppFunc environment and maps it to my OwinEnvironment type:

    let getOwinEnvironment (env: IDictionary<string , obj>) = {
        httpMethod = env.["owin.RequestMethod"] :?> string;
        requestBody = env.["owin.RequestBody"] :?> Stream;
        responseBody = env.["owin.ResponseBody"] :?> Stream;
        setResponseStatusCode = 
            fun (statusCode: int) -> env.["owin.ResponseStatusCode"] <- statusCode
        setResponseReasonPhrase = 
            fun (reasonPhrase: string) -> env.["owin.ResponseReasonPhrase"] <- reasonPhrase
    }

Now that we have our strongly typed OwinEnvironment, we can grab the request stream and response stream and do some kind of mapping. Here is a function that does this. It also only accepts POST requests, but you could do whatever you like in the body. Note the transform function is where the work is done.

    let handleOwinEnvironment (owin: OwinEnvironment) : unit =
        use writer = new StreamWriter(owin.responseBody)
        match owin.httpMethod with
        | "POST" ->
            use reader = new StreamReader(owin.requestBody)
            writer.Write(transform(reader.ReadToEnd()))
        | _ ->
            owin.setResponseStatusCode 400
            owin.setResponseReasonPhrase "Bad Request"
            writer.Write("Only POST requests are allowed")

Just for completeness, here is a trivial transform example:

    let transform (request: string) : string =
        sprintf "%s transformed" request

Now we can re-visit our console Main function and pipe everything together:

    [<entrypoint>]
    let main argv = 

        use server = 
            Nowin.ServerBuilder
                .New()
                .SetEndPoint(new IPEndPoint(IPAddress.Any, port))
                .SetOwinApp(fun env -> 
                    env 
                    |> getOwinEnvironment 
                    |> handleOwinEnvironment 
                    |> endWithCompletedTask)
                .Build()

        server.Start() 

        printfn "Server listening on http://localhost:%i/ \nhit  to stop." port
        Console.ReadLine() |> ignore

        0

The endWithCompletedTask function, is a little convenience to hide the ugly synchronous Task return code:

    let endWithCompletedTask = fun x -> Task.FromResult(null) :> Task

So as you can see, OWIN and Nowin make it very easy to create small web servers with F#. Next time you just need a simple service stub or test server, consider doing something like this, rather that using a heavyweight server and application framework such as IIS, MVC, WebAPI or WebForms.

You can find the complete code for the example in this Gist https://gist.github.com/mikehadlow/c88e82ee98619f22f174:

Inject DateTime.Now to Aid Unit Tests

$
0
0
If you have logic that relies on the current system date, it's often difficult to see how to unit test it. But by injecting a function that returns DateTime.Now we can stub the current date to be anything we want it to be.
Let's look at an example. Here we have a simple service that creates a new user instance and saves it in a database:
    public class UserService : IUserService
    {
        private readonly IUserData userData;

        public UserService(IUserData userData)
        {
            this.userData = userData;
        }

        public void CreateUser(string username)
        {
            var user = new User(username, createdDateTime: DateTime.UtcNow);
            userData.SaveUser(user);
        }
    }
Now if I want to write a unit test that checks that the correct created date is set, I have to rely on the assumption that the system date won't change between the creation of the User instance and the test assertions.
    [TestFixture]
    public class UserServiceTests
    {
        private IUserService sut;
        private IUserData userData;

        [SetUp]
        public void SetUp()
        {
            userData = MockRepository.GenerateStub<iuserdata>();
            sut = new UserService(userData);
        }

        [Test]
        public void UserServiceShouldCreateUserWithCorrectCreatedDate()
        {
            User user = null;

            // using Rhino Mocks to grab the User instance passed to the IUserData stub
            userData.Stub(x => x.SaveUser(null)).IgnoreArguments().Callback<user>(x =>
            {
                user = x;
                return true;
            });

            sut.CreateUser("mike");

            Assert.AreEqual(DateTime.UtcNow, user.CreatedDateTime);
        }
    }
But in this case, probably because Rhino Mocks is doing some pretty intensive proxying, a few milliseconds pass between the user being created and my assertions running.
Test 'Mike.Spikes.InjectingDateTime.UserServiceTests.UserServiceShouldCreateUserWithCorrectCreatedDate' failed: 
  Expected: 2015-05-28 09:08:18.824
  But was:  2015-05-28 09:08:18.819
 InjectingDateTime\InjectDateTimeDemo.cs(75,0): at Mike.Spikes.InjectingDateTime.UserServiceTests.UserServiceShouldCreateUserWithCorrectCreatedDate()
The solution is to inject a function that returns a DateTime:
    public class UserService : IUserService
    {
        private readonly IUserData userData;
        private readonly Func<datetime> now;

        public UserService(IUserData userData, Func<datetime> now)
        {
            this.userData = userData;
            this.now = now;
        }

        public void CreateUser(string username)
        {
            var user = new User(username, createdDateTime: now());
            userData.SaveUser(user);
        }
    }
Now our unit test can rely on a fixed DateTime value rather than one that is changing as the test runs:
    [TestFixture]
    public class UserServiceTests
    {
        private IUserService sut;
        private IUserData userData;

        // stub the system date as some arbirary date
        private readonly DateTime now = new DateTime(2015, 5, 28, 10, 46, 33);

        [SetUp]
        public void SetUp()
        {
            userData = MockRepository.GenerateStub<iuserdata>();
            sut = new UserService(userData, () => now);
        }

        [Test]
        public void UserServiceShouldCreateUserWithCorrectCreatedDate()
        {
            User user = null;
            userData.Stub(x => x.SaveUser(null)).IgnoreArguments().Callback<user>(x =>
            {
                user = x;
                return true;
            });

            sut.CreateUser("mike");

            Assert.AreEqual(now, user.CreatedDateTime);
        }
    }
And the test passes as expected.
In our composition root we inject the current system time (here as UTC):
    var userService = new UserService(userData, () => DateTime.UtcNow);
This pattern can be especially useful when we want to test business logic that relies on time passing. For example, say we want to check if an offer has expired; we can write unit tests for the case where the current (stubbed) time is both before and after the expiry time just by injecting different values into the system-under-test. Because we can stub the system time to be anything we want it to be, it makes it easy to test time based busines logic.

C#: How to Record What Gets Written to or Read From a Stream

$
0
0

Streams are a very nice abstraction over a read/write loop. We can use them to represent the contents of a file, or a stream of bytes to or from a network socket. They make it easy to read and write large amounts of data without consuming large amounts of memory. Take this little code snippet:

Example.txt may be many GB in size, but this operation will only ever use the amount of memory configured for the buffer. As an aside, the .NET framework’s Stream class’s default buffer size is the maximum multiple of 4096 that is still smaller than the large object heap threshold (85K). This means it likely to be collected at gen zero by the garbage collector, but still gives good performance.

But what if we want to log or view the contents of Example.txt as it’s copied to the output file? Let me introduce my new invention: InterceptionStream. This is simple class that inherits and decorates Stream and takes an additional output stream. Each time the wrapped stream is read from, or written to, the additional output stream gets the same information written to it. You can use it like this:

I could just as well have wrapped the input stream with the InterceptionStream for the same result:

You can use a MemoryStream if you want to capture the log in memory and assign it to a string variable, but of course this negates the memory advantages of the stream copy since we’re now buffering the entire contents of the stream in memory:

Here is the InterceptionStream implementation. As you can see it’s very simple. All the work happens in the Read and Write methods:

C#: Program Entirely With Static Methods

$
0
0

OK, that’s a provocative title to get your attention. This post is really about how one can move to a more functional programming style and remove the need for much of the apparatus of object-oriented programming, including interfaces and classes. In this post, I’m going to take some typical object-oriented C# code and refactor it in a more functional style. I’ll show that the result is more concise and easier to test.

Over the past couple of years I’ve noticed that my C# coding style has changed drastically under the influence of functional programming. Gone are interfaces and instance classes to be replaced by static methods, higher-order functions and closures. It’s somewhat ironic since I spent many years as a cheerleader for object-oriented programming and I considered static methods a code smell.

I guess if I look at my programming career, it has the following progression:

Procedural –> Object-Oriented –> Functional

The OO phase now looks like something of a detour.

C# has all the essential features you need for functional programming – higher-order functions, closures, lambda expressions – that allow you to entirely ditch the OO programming model. This results in more concise, readable and maintainable code. It also has a huge impact on unit testing, allowing one to do away with complex mocking frameworks, and write far simpler tests.

Introducing our object oriented example

Let’s look at an example. First I’ll introduce a highly simplified OO example, a simple service that grabs some customer records from a data-store, creates some reports and then emails them. Then I’ll show the same code refactored in a more functional style using delegates and higher-order static methods.

Let’s look at the object-oriented example first:

Well written object-oriented code is compositional. Concrete classes depend on abstractions (interfaces). These interfaces are consumed as dependencies by classes that rely on them and are usually injected as constructor arguments. This is called Dependency Injection. It’s good practice to compose object instances in a single place in the application - the composition root - usually when the application starts up, or on a significant event, such as an HTTP request. The composition can be hand coded or handed off to an IoC container. The constructed graph is then executed by invoking a method on the root object. This often occurs via an application framework (such as MVC or WebApi) rather than being explicitly invoked by user code.

We are going to get some customer records, create some reports and then email them to our customers. So first we need three interfaces: a data access abstraction, a report building abstraction, and an emailing abstraction:

And here are the implementations. This is not a real program of course, I’ve just coded some dummy customers and the emailer simply writes to the console.

Now we have our service class that depends on the three abstractions and orchestrates the reporting process:

As you can see, we inject the dependencies as constructor arguments, store them in class properties, then invoke methods on them in the code in the RunCustomerReportBatch method. Some people like to store the dependencies in class fields instead. That’s a matter of choice.

Our composition root composes the ReportingService with its dependencies and then returns it for the program to invoke. Don’t forget this is a highly simplified example. Composition is usually far more complex:

To write a unit test for the reporting service we would typically use either hand-crafted mocks, or some kind of mocking framework. Here’s an example unit test using XUnit and Moq:

We first create mocks for ReportingService’s dependencies with the relevant methods stubbed, which we inject as constructor arguments. We then invoke ReportingService and verify that the emailer was invoked as expected.

So that’s our object-oriented example. It’s typical of much well constructed C# code that you will find in the wild. It’s the way I’ve been building software for many years now with much success.

However, this object-oriented code is verbose. About a third of it is simply OO stuff that we have to write repeatedly and mechanically rather than code that is actually solving our problem. This boilerplate includes: the class’ properties (or fields) to hold the dependencies; the assigning of constructor arguments to those properties; writing the class and constructor. We also need complex mocking frameworks simply to test this code. Surely that’s a smell that’s telling us something is wrong?

Enlightenment

Enlightenment begins when you realise that the dependencies and method arguments can actually just be seen as arguments that are applied at different times in the application’s lifecycle. Consider a class with a single method and a single dependency:

We could equally represent this as a static method with two arguments:

But how do we partially apply these arguments? How do we give ‘DoThing’ the IDependency argument at composition time and the ‘string arg’ at the point where it is required by the application logic? Simple: We use a closure. Anything taking a dependency on ‘DoThing’ will ask for an Action<string>, because that is the signature of the ‘Do’ method in our ‘Thing’ class. So in our composition root, we ‘close over’ our previously created IDependency instance in a lambda expression with the signature, Action<string>, that invokes our DoThing static method. Like this:

So the interface is replaced with the built-in Action<T> delegate, and the closure is effectively doing the job of our ‘Thing’ class, the interface’s implementation, but with far fewer lines of code.

Refactoring to functional

OK. Let’s go back to our example and change it to use this new insight. We don’t need the interface definitions. They are replaced by built in delegate types:

ICustomerData becomes Func<IEnumerable<Customer>>

IEmailer becomes Action<string, string>

IReportBuilder becomes Func<Customer, Report>

The classes are replaced with static methods:

Our ReportingService is also replaced with a single static method that takes its dependencies as delegate arguments:

Composition looks like this:

This is functionally equivalent to the object-oriented code above, but it has 57 lines of code as opposed to 95; exactly 60% of the original code.

There’s also a marked simplification of the unit test:

The requirement for a complex mocking framework vanishes. Instead we merely have to set up simple lambda expressions for our stubs. Expectations can be validated with closed over local variables. It’s much easier to read and maintain.

Moving to a functional style of programming is certainly a huge departure from most C# code that you find in the wild and can initially look a little odd to the uninitiated. But it has many benefits, making your code more concise and easier to test and reason about. C# is, surprisingly, a perfectly adequate functional programming language, so don’t despair if for practical reasons you can’t use F#.

The complete code example for this post is on GitHub here: https://github.com/mikehadlow/FunctionalDemo

Partial Application in C#

$
0
0

My recent post, C# Program Entirely With Static Methods, got lots of great comments. Indeed, as is often the case, the comments are in many ways a better read than the original post. However, there were several commenters who claimed that C# does not have partial application. I take issue with this. Any language that supports higher order functions, that is, functions that can take functions as arguments and can return functions, by definition, supports partial application. C# supports higher order functions, so it also supports partial application.

Let me explain.

Let’s start by looking at partial application in F#. Here’s a simple function that adds two numbers (you can type this into F# interactive):

>let add a b = a + b;;

Now we call use our ‘add’ function to add two numbers, just as we’d expect:

> add 3 4;;
val it : int = 7

But because F# supports partial application we can also do this:

> let add3 = add 3;;> add3 4;;
val it : int = 7

We call add with a single argument and it returns a function that takes a single argument which we can then use to add three to any number.

That’s partial application. Of course, if I try this in C# it doesn’t work:

image

Red squiggly line saying “delegate Func has two parameters but is invoked with one argument.

Case proven you say: C# does not support partial application!

But wait!

Let’s look again at the F# add function. This time I’ll include the response from F# interactive:

> let add a b = a + b;;
val add : a:int -> b:int -> int

This shows us the type of the add function. The important bit is: “a:int –> b:int –> int”. This tells us that ‘add’ is a function that takes an int and returns a function that takes an int and returns an int. It is not a function with two arguments. F# is a restrictive language, it only has functions with single arguments. That is a good thing. See Mark Seemann’s post Less is More: Langauge Features for an in depth discussion of how taking features away from a language can make it better. When people say “F# supports partial application” what they really mean is that “F# functions can only have one argument.” The F# compiler understands the syntax ‘let add a b = …’ to mean “I want a function that takes a single argument and returns a function that takes another single argument.”

There’s nothing to stop us from defining our C# function with the same signature as our F# example. Then we can partially apply it in the same way:

image

There you are: partial application in C#. No problem at all.

“But!” You cry, “That’s weird and unusual C#. I don’t want to define all my functions in such a strange way.” In that case, let me introduce you to my friend Curry. It’s not a spicy dish of South Asian origin but the process of turning a function with multiple arguments into a series of higher order functions. We can define a series of overloaded Curry extension methods:

image

We can then use them to turn ‘ordinary’ C# functions with multiple arguments into higher-order functions which we can partially apply:

image

Thinking more about Mark Seemann’s blog post, it would be an interesting exercise to start to take features away from C# whilst keeping syntactic changes to a minimum. If we took away multiple function arguments, classes, interfaces, nullable types, default mutability etc, would we end up with a subset language that would be perfect for functional programming, but still familiar to C# developers? You would of course lose backward compatibility with existing C# code, so the incentive to do it isn’t that great, but it’s a fascinating thought experiment.

Viewing all 112 articles
Browse latest View live